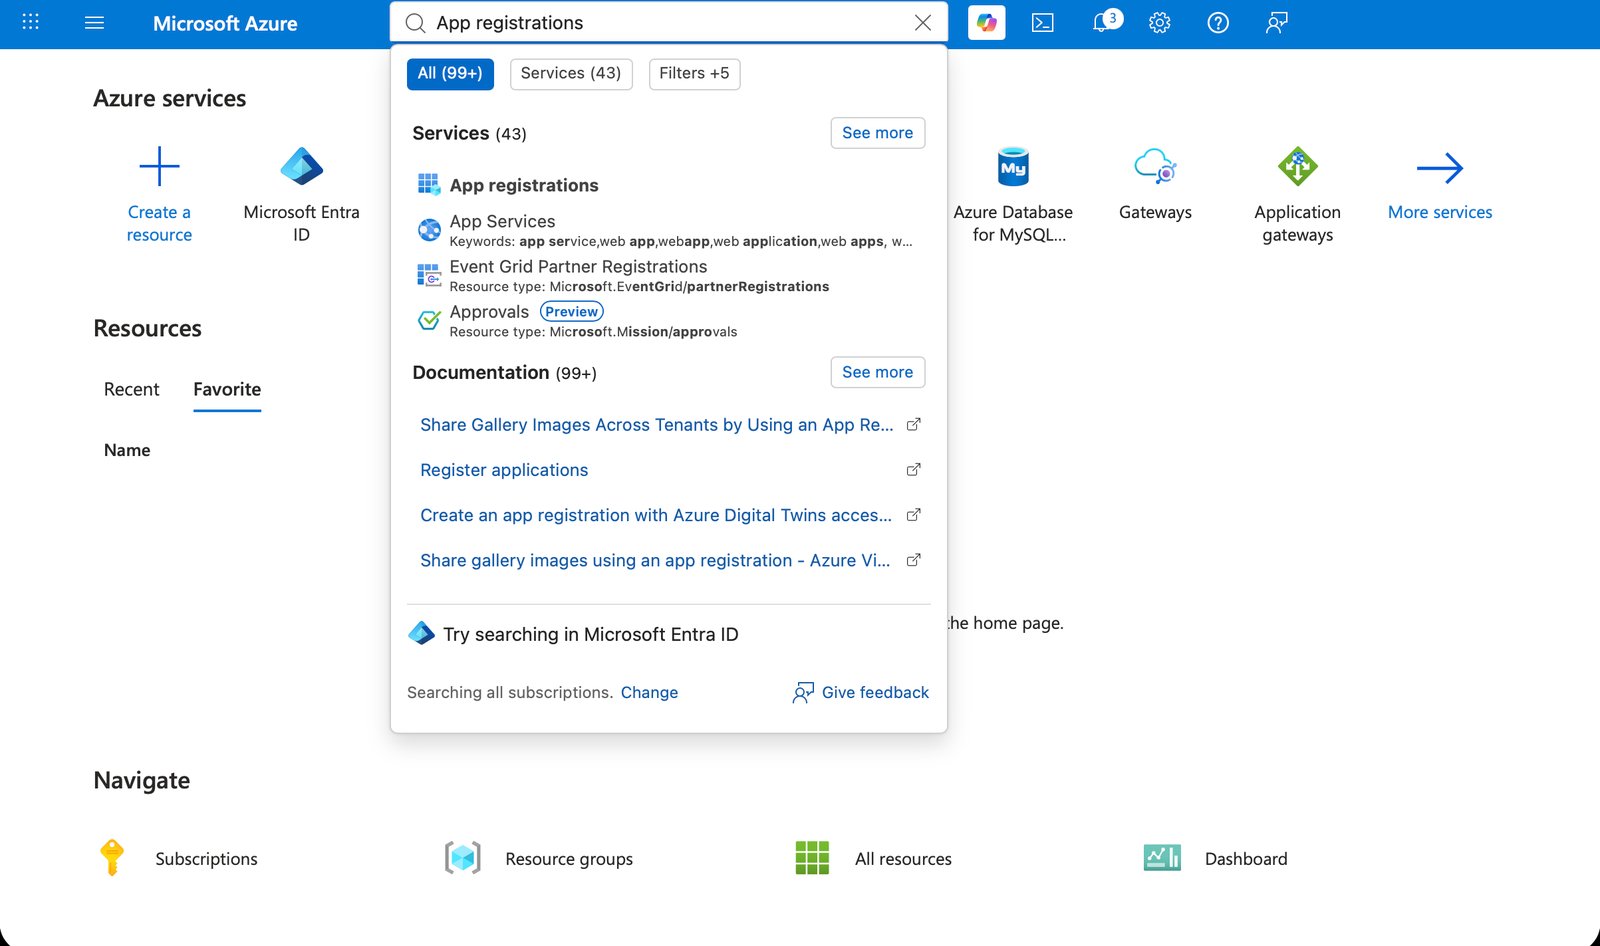
 Select **New registration**:
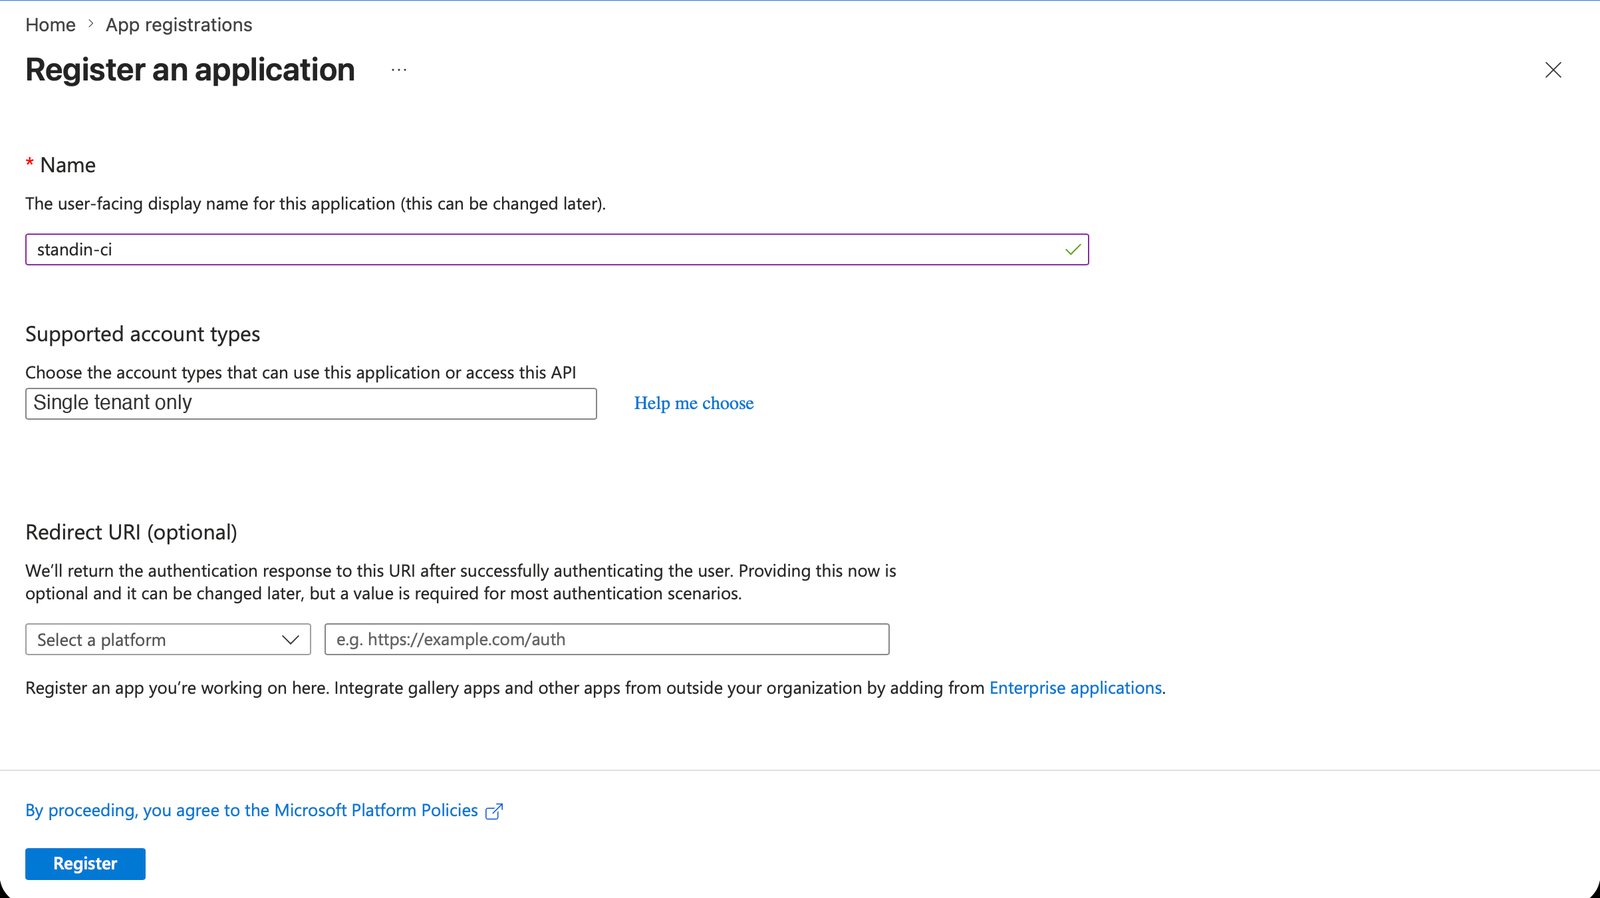
* **Name**: anything you like (users never see it; the Teams app name comes from the manifest).
* **Supported account types**: **Single tenant only** is the right choice for a bot that serves
your own organization.
* **Redirect URI**: leave empty.
Select **New registration**:
* **Name**: anything you like (users never see it; the Teams app name comes from the manifest).
* **Supported account types**: **Single tenant only** is the right choice for a bot that serves
your own organization.
* **Redirect URI**: leave empty.
 Official reference: [Register an application with the Microsoft identity platform](https://learn.microsoft.com/en-us/entra/identity-platform/quickstart-register-app).
## 2. Record the IDs
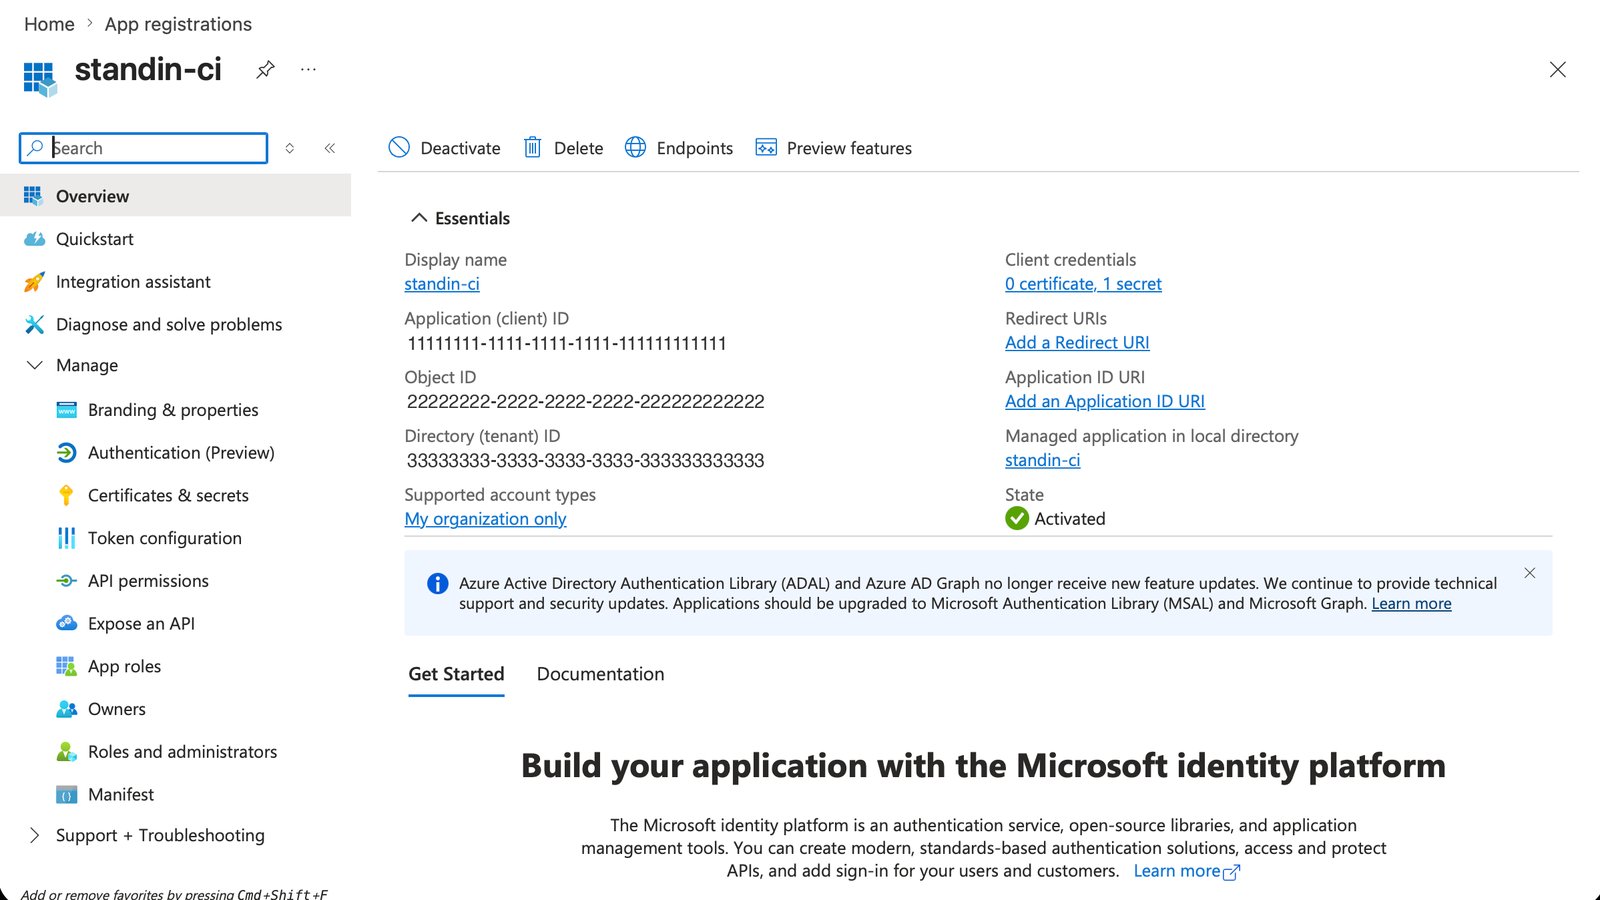
On the app's **Overview** page, copy two values - you will need them repeatedly:
* **Application (client) ID** - this is your **`botId`** (and the `MicrosoftAppId` of the Azure Bot).
* **Directory (tenant) ID** - your tenant.
Official reference: [Register an application with the Microsoft identity platform](https://learn.microsoft.com/en-us/entra/identity-platform/quickstart-register-app).
## 2. Record the IDs
On the app's **Overview** page, copy two values - you will need them repeatedly:
* **Application (client) ID** - this is your **`botId`** (and the `MicrosoftAppId` of the Azure Bot).
* **Directory (tenant) ID** - your tenant.
 ## 3. Create a client secret
Under **Certificates & secrets**, select **New client secret** and copy the secret **Value**
immediately - it is shown only once. StandIn uses this credential (App ID + secret + tenant) to
authenticate as your bot; you provide it during [pairing](/quickstart#connect-your-agent-by-pairing-recommended)
or in the dashboard when registering the identity.
## 3. Create a client secret
Under **Certificates & secrets**, select **New client secret** and copy the secret **Value**
immediately - it is shown only once. StandIn uses this credential (App ID + secret + tenant) to
authenticate as your bot; you provide it during [pairing](/quickstart#connect-your-agent-by-pairing-recommended)
or in the dashboard when registering the identity.
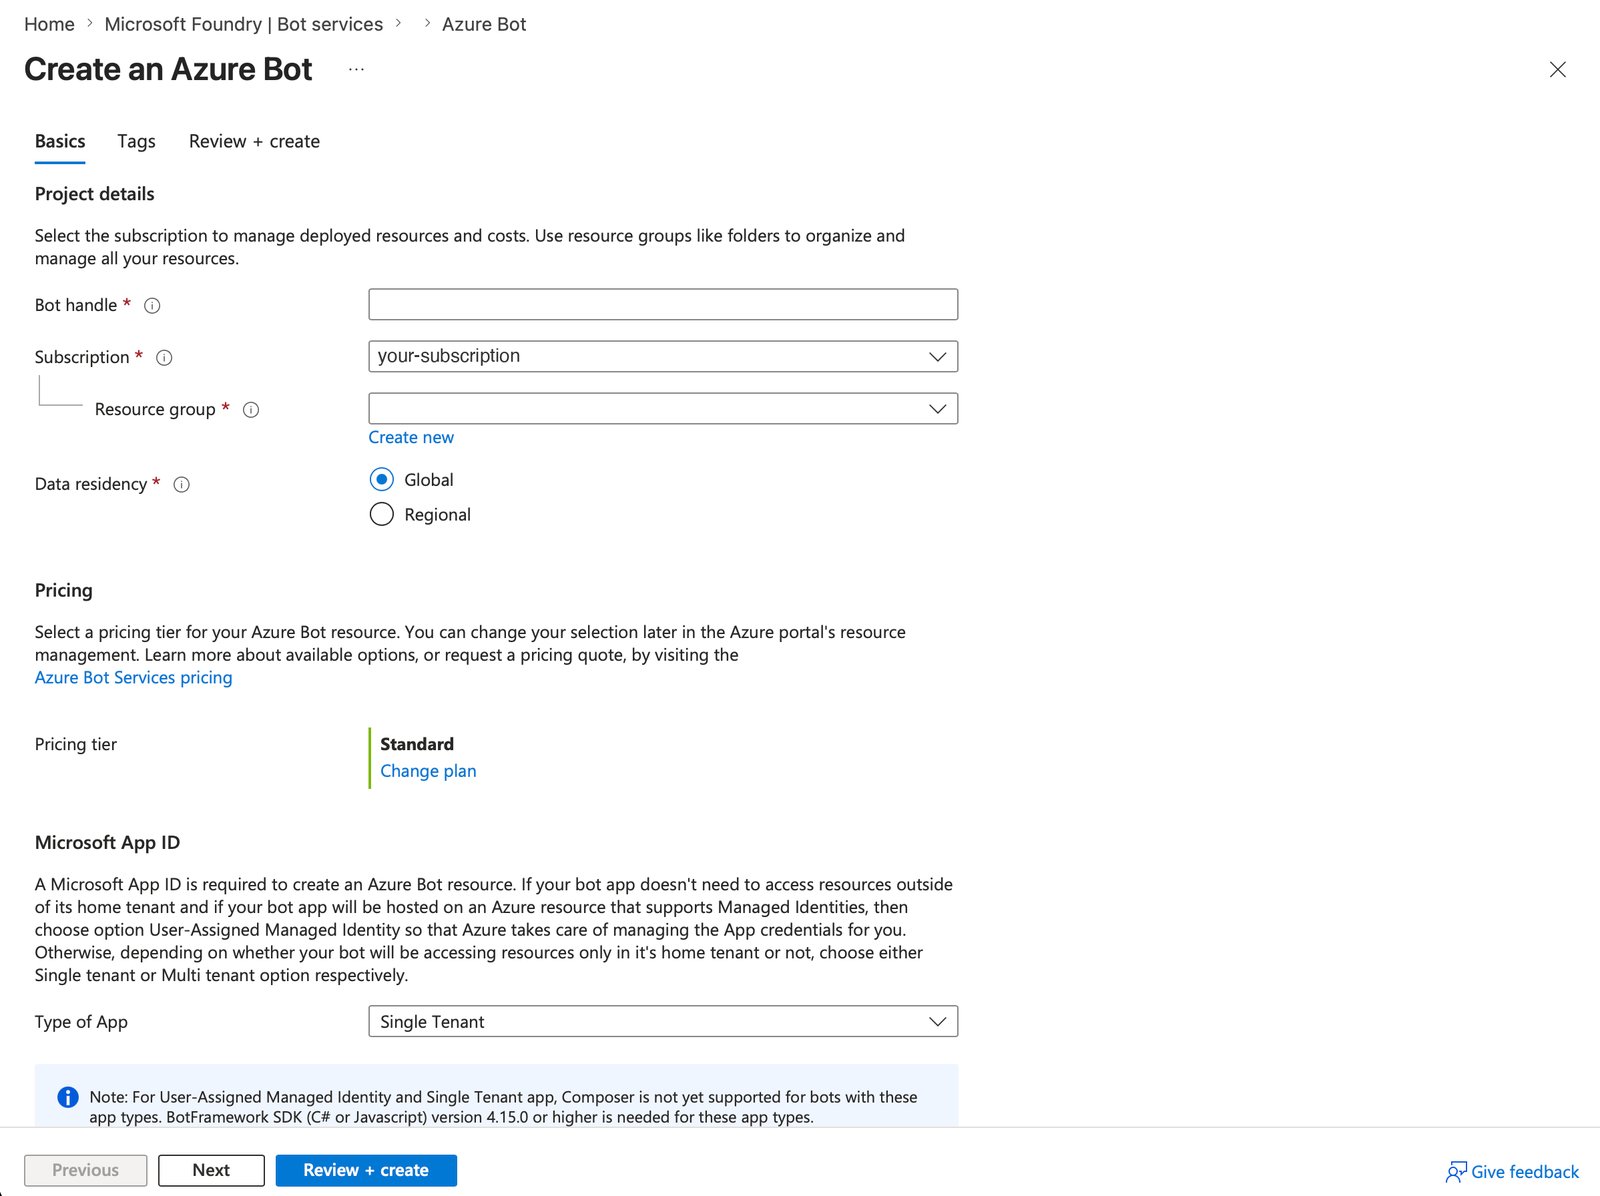
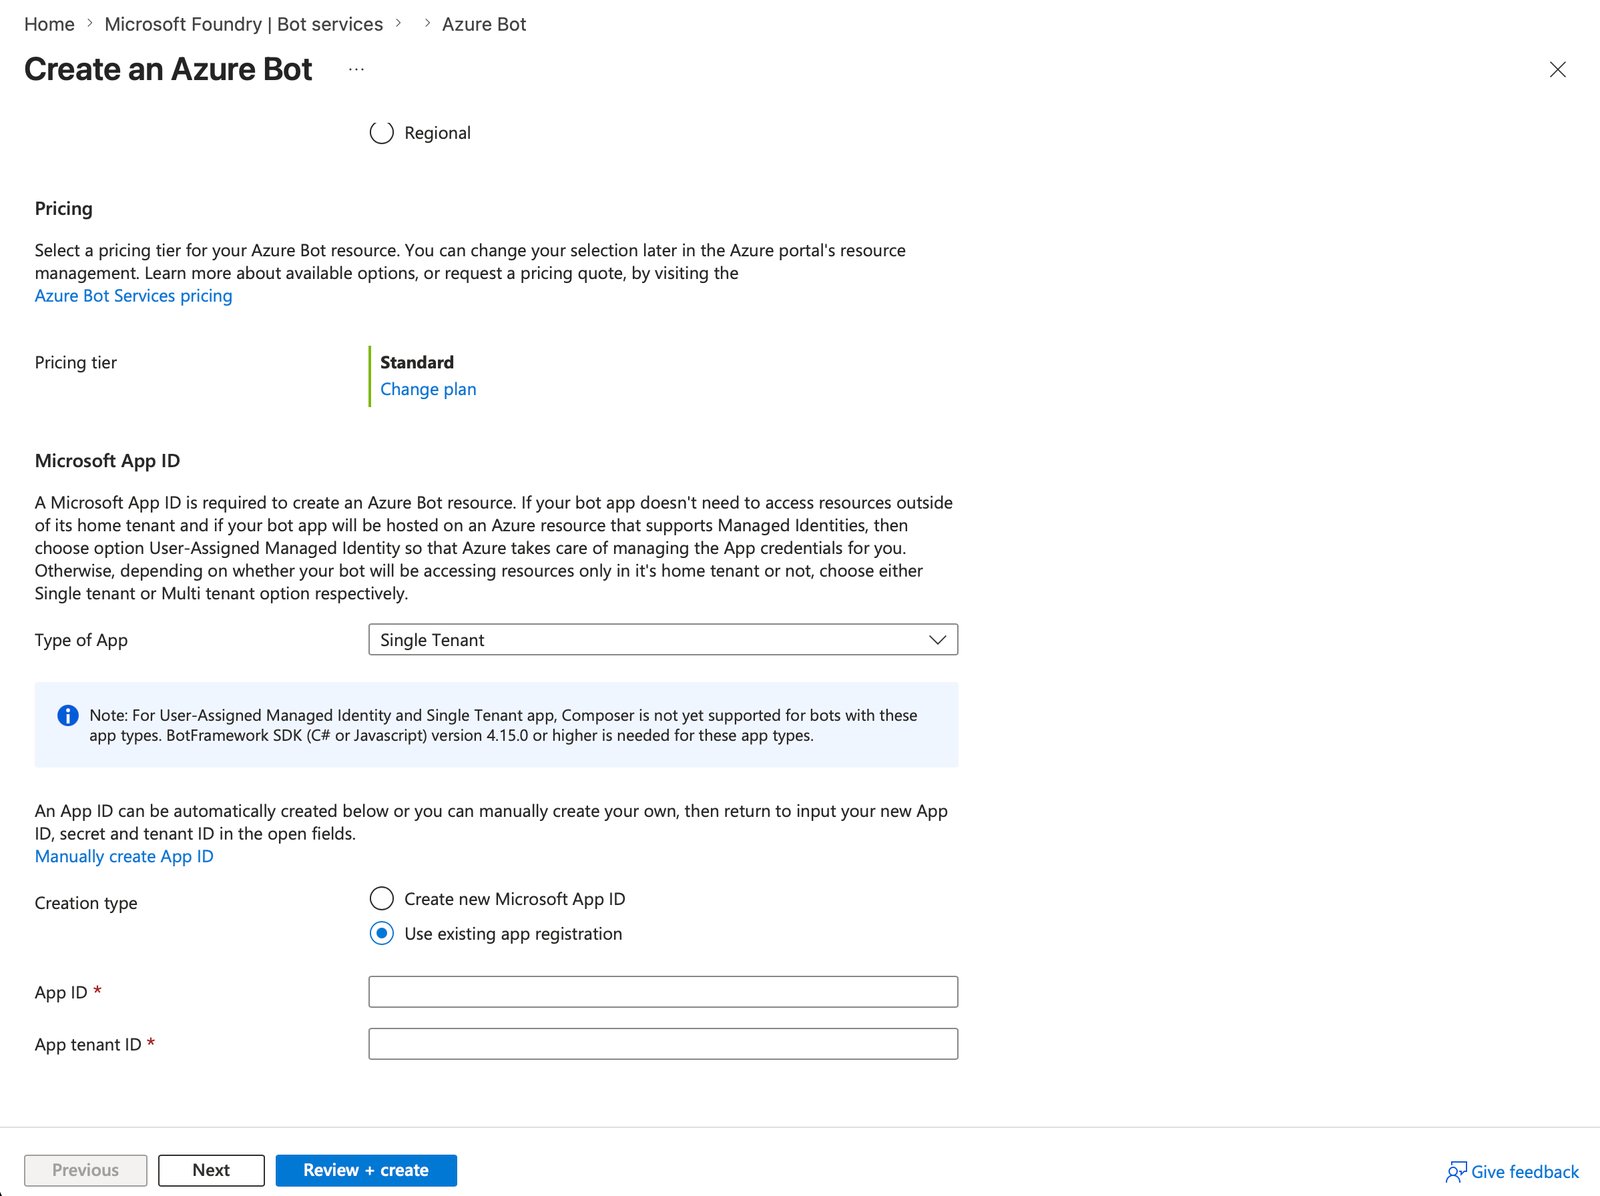
 Create an **Azure Bot** and fill in the basics:
* **Bot handle / subscription / resource group**: your choice.
* **Data residency**: Global is typical.
* **Pricing tier**: the free **F0** tier is fine (Standard channels like Teams are free).
* **Type of App**: **Single Tenant**, matching the app registration.
Create an **Azure Bot** and fill in the basics:
* **Bot handle / subscription / resource group**: your choice.
* **Data residency**: Global is typical.
* **Pricing tier**: the free **F0** tier is fine (Standard channels like Teams are free).
* **Type of App**: **Single Tenant**, matching the app registration.
 Under **Microsoft App ID**, choose **Use existing app registration** and paste the **App ID**
(client ID) and **App tenant ID** from step 2, then **Review + create**.
Under **Microsoft App ID**, choose **Use existing app registration** and paste the **App ID**
(client ID) and **App tenant ID** from step 2, then **Review + create**.
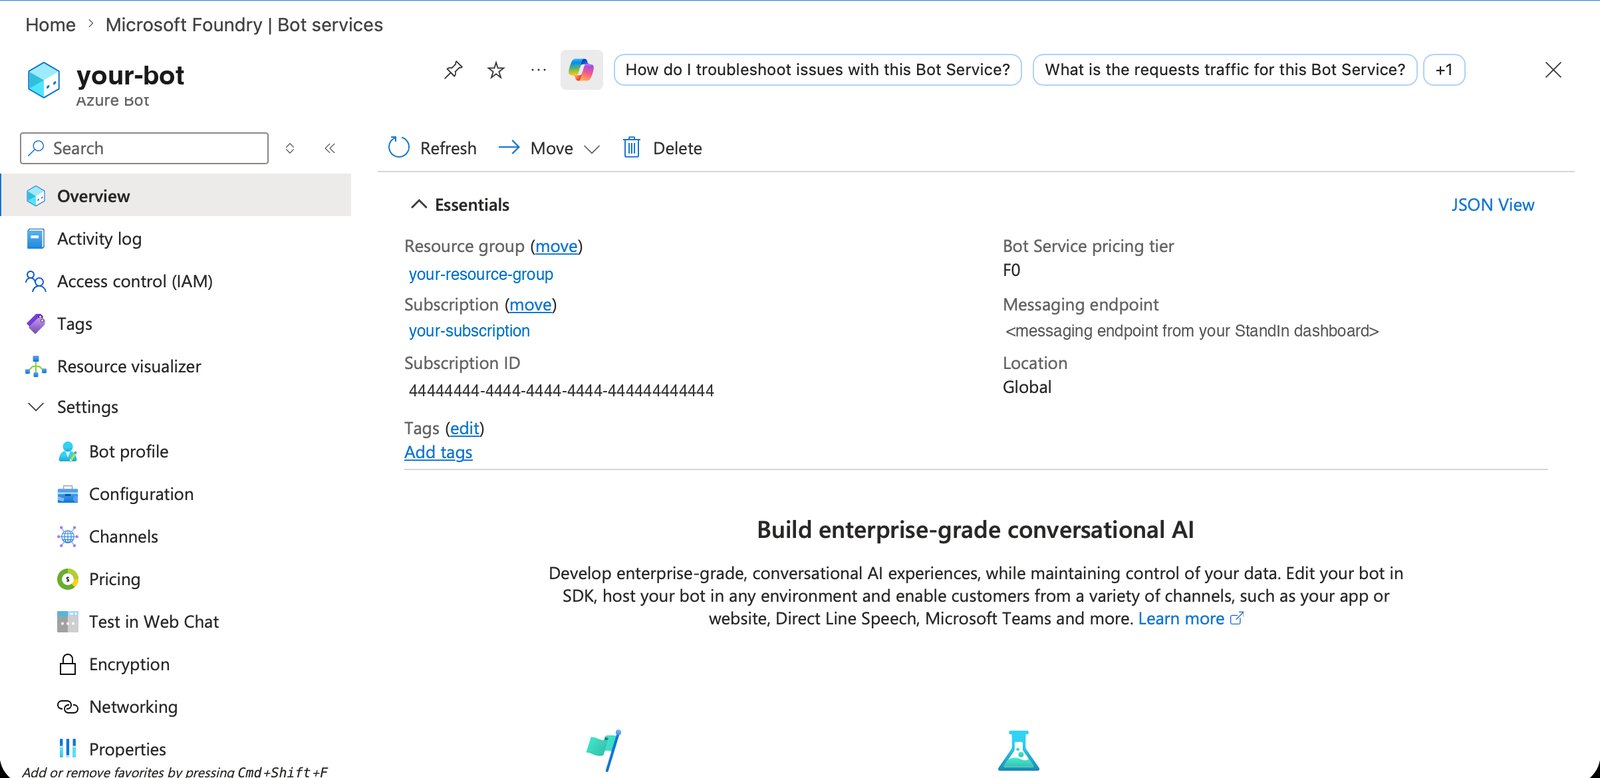
 Once deployment finishes, the resource's **Overview** shows the essentials - pricing tier, location,
and (after step 7) the messaging endpoint:
Once deployment finishes, the resource's **Overview** shows the essentials - pricing tier, location,
and (after step 7) the messaging endpoint:
 Official reference: [Create an Azure Bot resource](https://learn.microsoft.com/en-us/azure/bot-service/abs-quickstart).
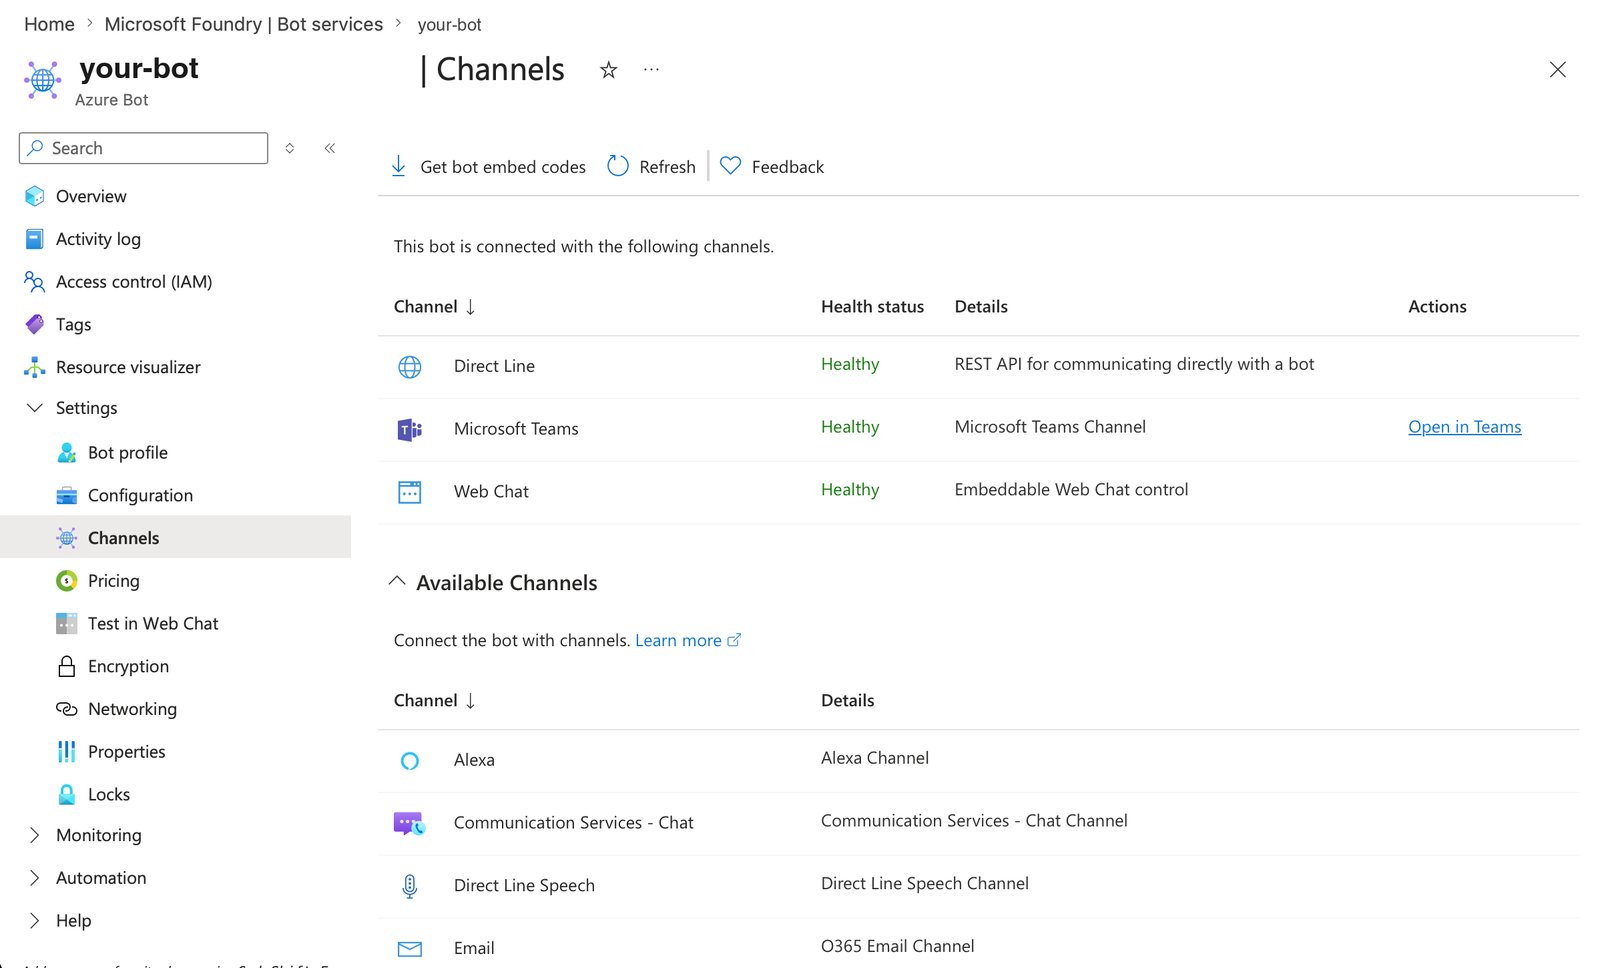
## 5. Enable the Microsoft Teams channel
Open the new Azure Bot resource, go to **Settings → Channels**, and select **Microsoft Teams**.
Accept the terms and apply; the channel appears under connected channels as **Healthy**.
Official reference: [Create an Azure Bot resource](https://learn.microsoft.com/en-us/azure/bot-service/abs-quickstart).
## 5. Enable the Microsoft Teams channel
Open the new Azure Bot resource, go to **Settings → Channels**, and select **Microsoft Teams**.
Accept the terms and apply; the channel appears under connected channels as **Healthy**.
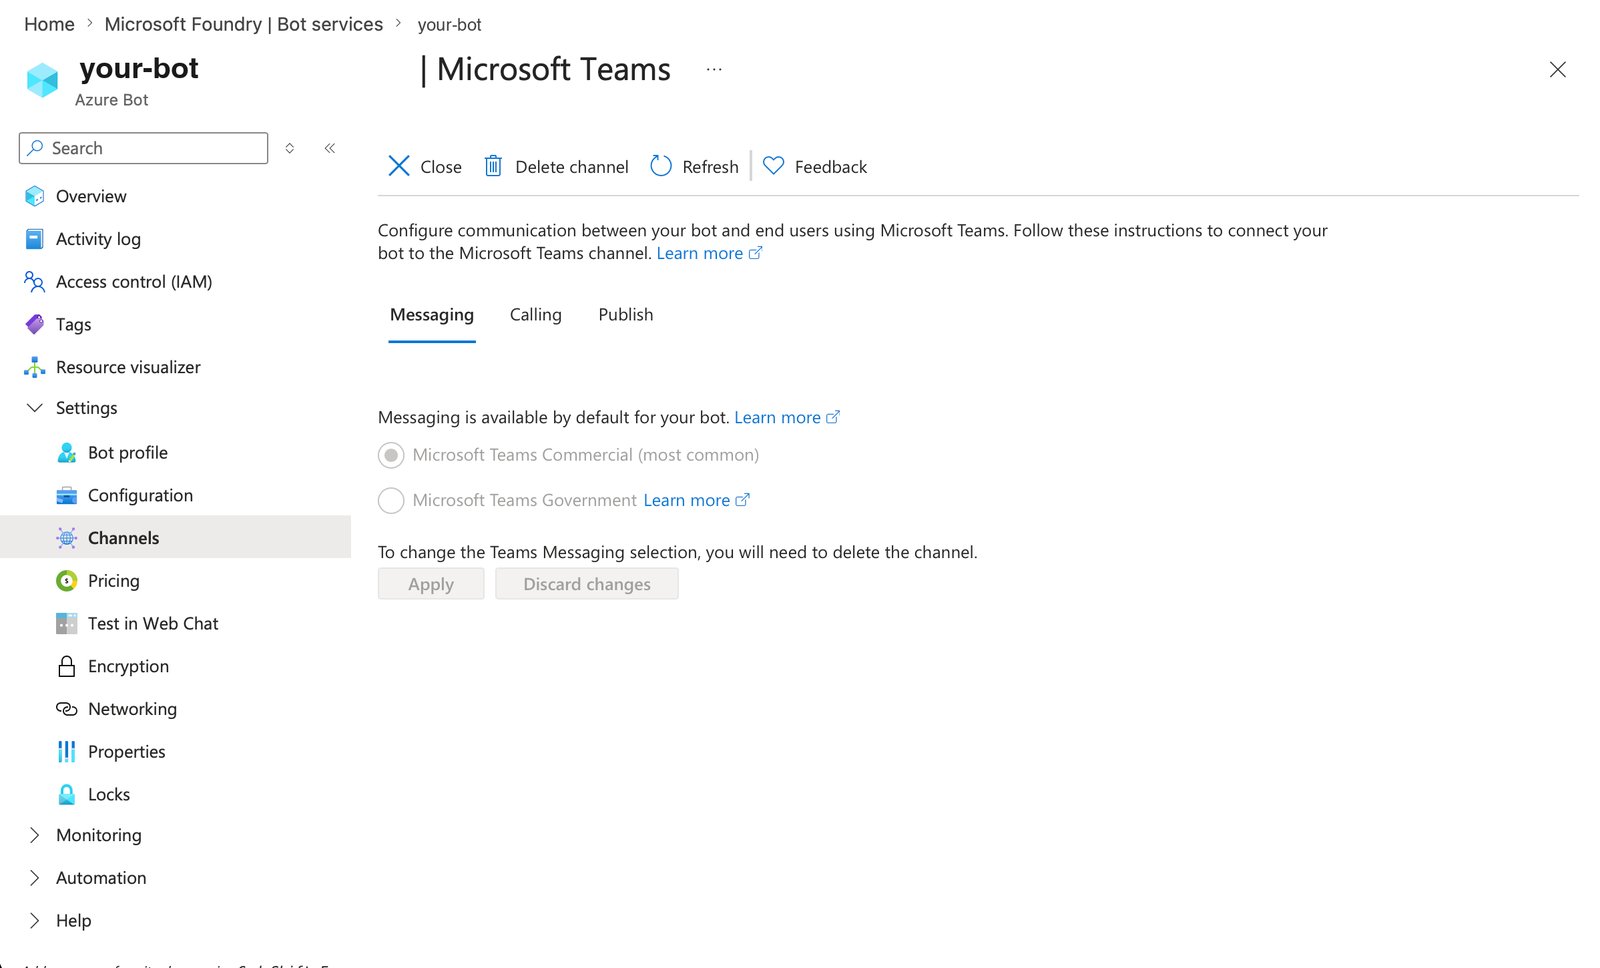
 Opening the channel shows three tabs - **Messaging**, **Calling**, and **Publish**. Messaging is on
by default (**Microsoft Teams Commercial** is right for most tenants); the next step configures
Calling.
Opening the channel shows three tabs - **Messaging**, **Calling**, and **Publish**. Messaging is on
by default (**Microsoft Teams Commercial** is right for most tenants); the next step configures
Calling.
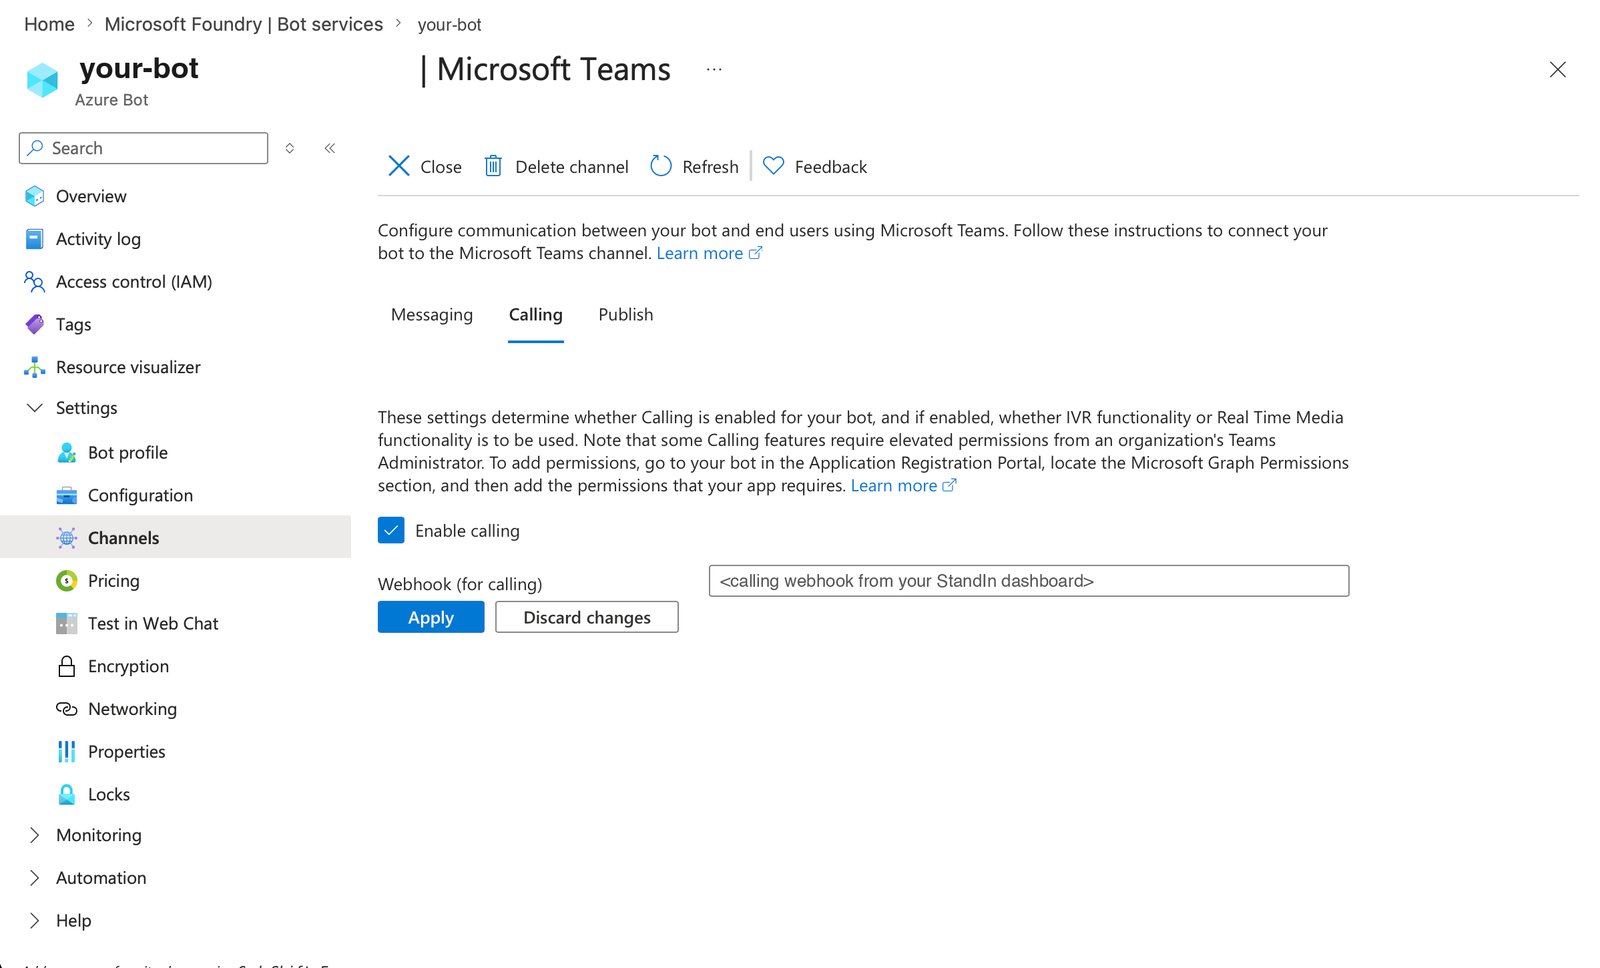
 ## 6. Enable calling and set the webhook
Still in the Teams channel, open the **Calling** tab:
1. Check **Enable calling**.
2. Set **Webhook (for calling)** to the **calling webhook URL from your StandIn dashboard** (shown
on your identity after you register it).
3. **Apply**.
## 6. Enable calling and set the webhook
Still in the Teams channel, open the **Calling** tab:
1. Check **Enable calling**.
2. Set **Webhook (for calling)** to the **calling webhook URL from your StandIn dashboard** (shown
on your identity after you register it).
3. **Apply**.
 Official references: [Registering a calling bot](https://microsoftgraph.github.io/microsoft-graph-comms-samples/docs/articles/calls/register-calling-bot.html)
(Microsoft Graph communications samples - covers this whole page end to end) and
[Register a calling bot for Teams](https://learn.microsoft.com/en-us/microsoftteams/platform/bots/calls-and-meetings/registering-calling-bot).
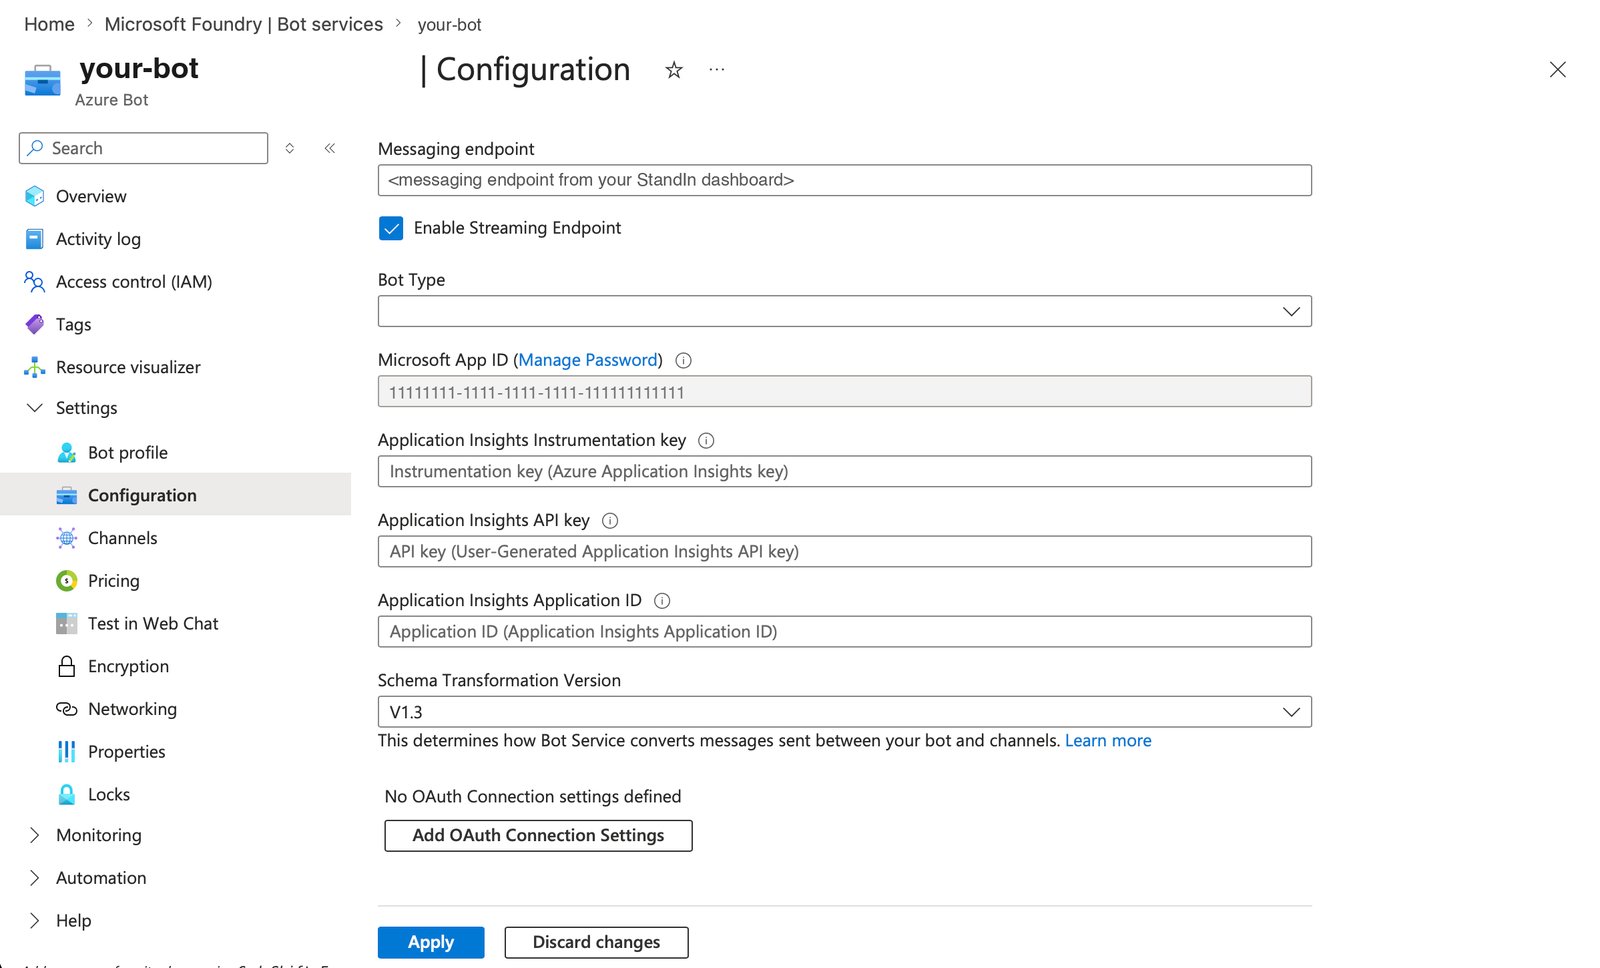
## 7. Set the messaging endpoint (optional, for chat)
Voice works without this step. If you also want **Teams chat**, go to **Settings → Configuration**
and set **Messaging endpoint** to the URL from your StandIn dashboard.
Official references: [Registering a calling bot](https://microsoftgraph.github.io/microsoft-graph-comms-samples/docs/articles/calls/register-calling-bot.html)
(Microsoft Graph communications samples - covers this whole page end to end) and
[Register a calling bot for Teams](https://learn.microsoft.com/en-us/microsoftteams/platform/bots/calls-and-meetings/registering-calling-bot).
## 7. Set the messaging endpoint (optional, for chat)
Voice works without this step. If you also want **Teams chat**, go to **Settings → Configuration**
and set **Messaging endpoint** to the URL from your StandIn dashboard.
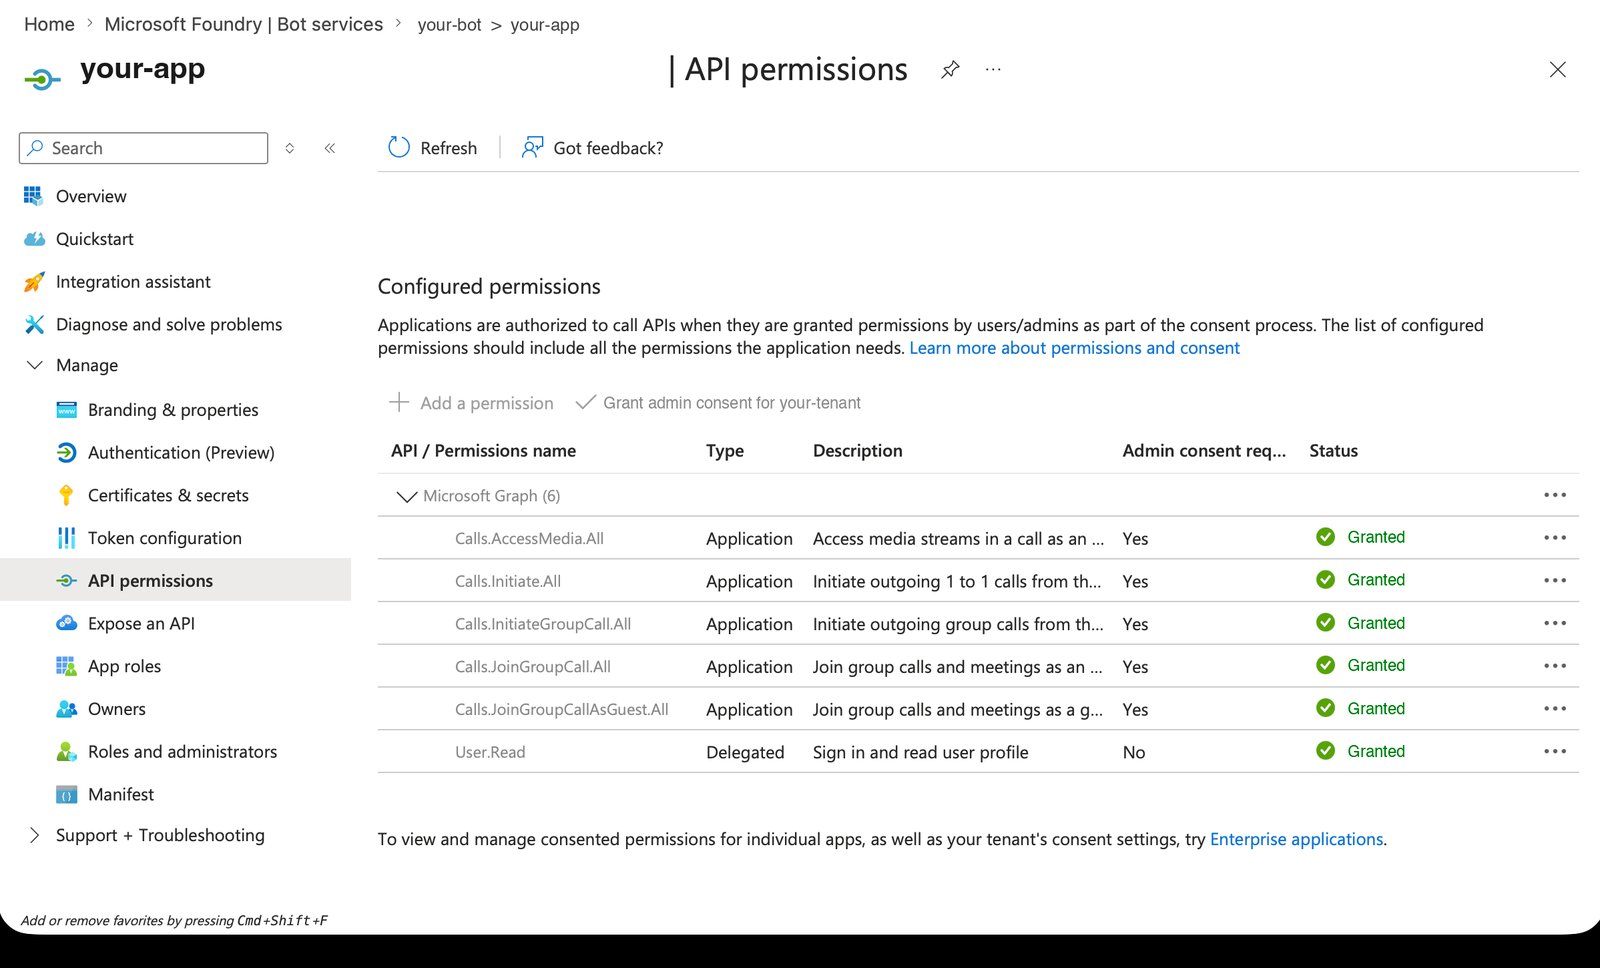
 This is the canonical list - it applies to all six bridges and plugins:
| Permission | Purpose |
|---|---|
| `Calls.JoinGroupCall.All` | answer / join Teams calls and meetings |
| `Calls.JoinGroupCallAsGuest.All` | join meetings as a guest participant |
| `Calls.AccessMedia.All` | access real-time Teams call audio/video media |
| `Calls.Initiate.All` | outbound 1:1 "call me back" (skip if unused) |
| `Calls.InitiateGroupCall.All` | outbound group "call me back" (skip if unused) |
| `Chat.Read.All` | resolve chat / thread ids and read message context |
| `ChatMessage.Read.Chat` | read messages in chats the bot is installed in |
| `Sites.ReadWrite.All` | upload files / minutes to SharePoint (OneDrive) for chat attachments (optional) |
 Official references: [Registering a calling bot](https://microsoftgraph.github.io/microsoft-graph-comms-samples/docs/articles/calls/register-calling-bot.html)
(lists the `Calls.*` permissions), [Grant tenant-wide admin consent](https://learn.microsoft.com/en-us/entra/identity/enterprise-apps/grant-admin-consent),
and the [cloud communications API overview](https://learn.microsoft.com/en-us/graph/cloud-communications-get-started).
## Checkpoint
You should now have:
* [x] **Client ID** (`botId`), **tenant ID**, and a **client secret**
* [x] An **Azure Bot** with the **Teams channel** enabled
* [x] **Calling enabled** and the webhook pointed at StandIn
* [x] (Optional) **Messaging endpoint** set for chat
* [x] Graph permissions **admin-consented**
Next: [Get the Teams app package](/teams/app-package).
Official references: [Registering a calling bot](https://microsoftgraph.github.io/microsoft-graph-comms-samples/docs/articles/calls/register-calling-bot.html)
(lists the `Calls.*` permissions), [Grant tenant-wide admin consent](https://learn.microsoft.com/en-us/entra/identity/enterprise-apps/grant-admin-consent),
and the [cloud communications API overview](https://learn.microsoft.com/en-us/graph/cloud-communications-get-started).
## Checkpoint
You should now have:
* [x] **Client ID** (`botId`), **tenant ID**, and a **client secret**
* [x] An **Azure Bot** with the **Teams channel** enabled
* [x] **Calling enabled** and the webhook pointed at StandIn
* [x] (Optional) **Messaging endpoint** set for chat
* [x] Graph permissions **admin-consented**
Next: [Get the Teams app package](/teams/app-package).